
Advanced Hardware Lab 5-6: Replace Parts in a Laptop All-in-One delves into the intricacies of laptop repair, empowering individuals with the knowledge and skills to tackle common hardware issues. This guide provides a comprehensive overview of the process, ensuring a successful and efficient repair experience.
Through detailed instructions, safety precautions, and troubleshooting tips, readers will gain a thorough understanding of identifying faulty components, installing replacements, and maintaining their laptop all-in-one for optimal performance.
Introduction

Replacing parts in a laptop all-in-one is a crucial aspect of maintaining and repairing these devices. By understanding the process and following proper techniques, you can effectively troubleshoot and resolve hardware issues, ensuring optimal performance and extending the lifespan of your laptop.
The process involves identifying the faulty part, safely removing it, installing the replacement part, and testing the system to ensure proper functionality. It requires a combination of technical knowledge, precision, and adherence to safety precautions.
Tools and Materials
Before beginning the repair, gather the necessary tools and materials:
- Anti-static wrist strap
- Precision screwdrivers (Phillips and flathead)
- Tweezers
- Replacement part
- Thermal paste (for CPU or GPU replacement)
- Isopropyl alcohol and cotton swabs (for cleaning)
Safety Precautions
Always prioritize safety when working with electronic devices:
- Wear an anti-static wrist strap to prevent electrostatic discharge (ESD) damage.
- Power down the laptop and disconnect all cables.
- Handle components gently and avoid touching sensitive areas like pins or connectors.
- Use a clean, well-lit work area to minimize the risk of accidents.
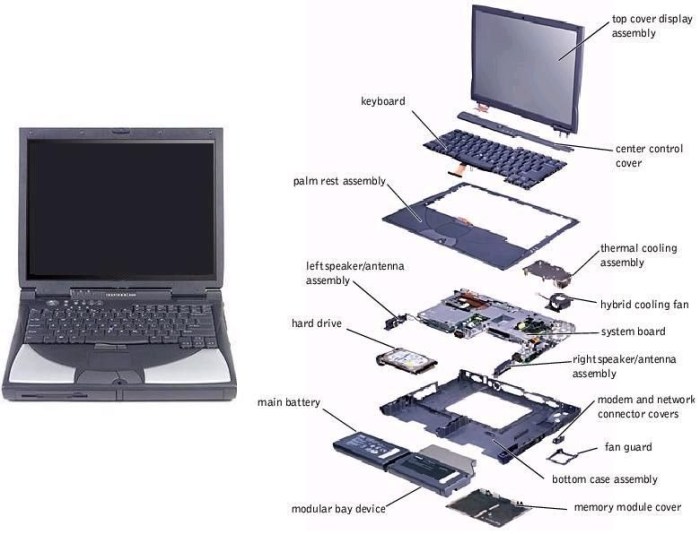
Identifying and Removing the Faulty Part
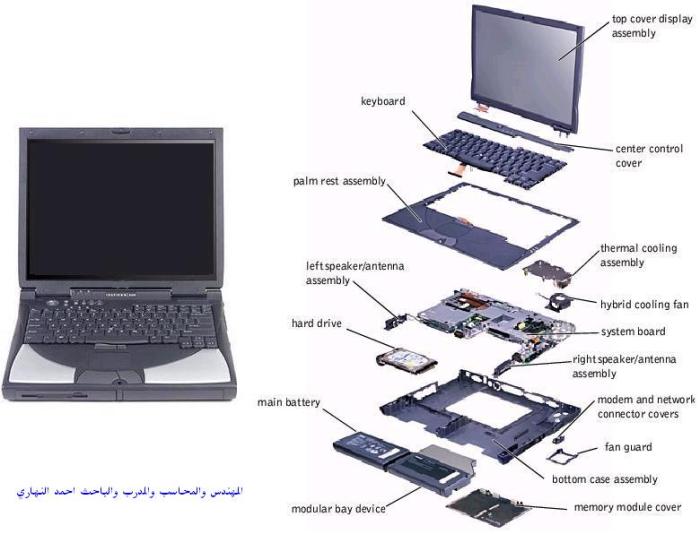
Identifying the faulty part requires diagnostic testing or observation of symptoms:
- Display issues: Check for cracked or broken screens, loose connections, or backlight problems.
- Power problems: Ensure the power adapter is working, and check for loose battery connections or faulty power buttons.
- Hard drive issues: Listen for unusual noises or slow performance, which may indicate a failing hard drive.
Once identified, follow these steps to remove the faulty part:
- Disconnect any cables or connectors attached to the part.
- Unscrew the mounting screws securing the part in place.
- Gently lift and remove the faulty part.
Installing the Replacement Part
Installing the replacement part requires precision and care:
- Align the replacement part with the designated slot or mounting points.
- Gently insert the part and secure it with the mounting screws.
- Reconnect any cables or connectors that were disconnected during removal.
Testing and Troubleshooting
After installing the replacement part, power on the laptop and test its functionality:
- Check for proper display, power supply, and hard drive performance.
- If any issues arise, troubleshoot by rechecking connections, ensuring the part is seated correctly, and considering other potential causes.
Maintenance and Prevention: Advanced Hardware Lab 5-6: Replace Parts In A Laptop All-in-one
Regular maintenance can prevent future failures:
- Clean the laptop regularly to remove dust and debris.
- Avoid spilling liquids or exposing the laptop to extreme temperatures.
- Update software and drivers to address potential issues.
Detailed FAQs
What are the common signs of a faulty component in a laptop all-in-one?
Common signs include flickering or distorted display, unresponsive buttons or touchpad, overheating, and unusual noises.
How do I safely remove a faulty component from a laptop all-in-one?
Refer to the guide’s step-by-step instructions for safe component removal, ensuring proper grounding and handling techniques.
What are the key safety precautions to follow when working with electronic devices?
Always unplug the device, wear anti-static clothing or a grounding strap, and avoid touching sensitive components with bare hands.
